Contributors: Jellejurre, JustSleightly
Radial Puppets
Radial Puppets are a type of Expression Menu Control (See Expressions Menu and Parameters) that allow you to set a float between 0 and 1 based on the rotation of a puppet. This article will go over some common use cases and how to set them up.
This article will assume you know how to record certain values into Animation Clips. If you don’t know this, a step by step guide is given in the Animation Clips article.
There are two ways to animate a Radial Puppet: Motion Time and 1D Blend Tree.
Motion Time
With a Motion Time animation, you have a single animation which you use motion time to “scroll through”. To make this animation, you will want to make an animation with two key frames. One at 0:00 with the Hue Shift at 0, and one at 0:01 with the Hue Shift at 1.
Note that you will have to set Both Tangents to Linear in the Dope Sheet view of the Animation Window, otherwise your Animation won’t play smoothly.
To use this animation for a Motion Time Hue Shift, make sure your Radial Puppet Rotation Parameter is added to your FX layer as a Float, and add a new layer. Set the layer weight to 1 by clicking on the Gear icon, and dragging the Weight to 1.
Then, select your new layer, give it a new name by double clicking it, and create a new state in the layer, which will have as its Motion your animation, its Motion Time enabled, and as its Motion Time your Radial Puppet Rotation Parameter.
Make sure to Lock your material, so you can test it like it would be in game, and then you can use the Av3 Emulator or Gesture Manager from the VCC to test the Hue Shift.
The whole process, from start to finish, is shown here:
Blend Tree
With a Blend Tree animation, you will need two animations, each with two keyframes. One animation has its keyframes set to 0, the other has its keyframes set to 1. These animations will be put as the two children of a 1d Blend Tree, with the keyframe 0 animation set to parameter value 0, and the keyframe 1 animation set to parameter value 1.
To use this blend tree for a Motion Time Hue Shift, make sure your Radial Puppet Rotation Parameter is added to your FX layer as a Float, and add a new layer. Set the layer weight to 1 by clicking on the Gear icon, and dragging the Weight to 1.
Then, select your new layer, give it a new name by double clicking it, and create a new state in the layer with a blend tree by Right Clicking → Create State → From New Blend Tree, which will have as its children your two animations as described above, and as its Blend Parameter your Radial Puppet Rotation Parameter.
Make sure to Lock your material, so you can test it like it would be in game, and then you can use the Av3 Emulator or Gesture Manager from the VCC to test the Hue Shift.
The whole process, from start to finish, is shown here:
Pros and Cons
Motion Time
Pros:
- Only requires 1 animation
- Allows for finer control by adding more keyframes and editing their tangents
Cons:
- Can’t be added to Direct Blend Tree for optimization (see Combining Layers Using Direct Blend Trees)
Blend Tree
Pros:
- Can be added to Direct Blend Tree for optimization (see Combining Layers Using Direct Blend Trees)
Cons:
- Requires 2 animations
- Harder to have finer control since you need to make more animations, and even then it’s only linear
Applications of Radial Puppets
Anything that you can animate in an animation clip can be manipulated by a Radial Puppet. For some examples, see Types of Animation Clips.
Below are some common use cases
Hue Shift
A hue shift is a way to change the color (specifically, the Hue) of a Material. To make a hue shift, you will need to record Animation Clips which change the hue of the avatar.
An Example Hue Shift in the Poiyomi shader.
Note that if you are using the Poiyomi shader, you will need to set the Hue Shift field to Animated (when locked) if there is only one material you’re hue shifting on that mesh, or to Renamed (when locked) when there are multiple materials you’re hue shifting on that mesh.
This is done so that it will keep the right property animatable when the shader is locked, and that multiple hue shifts on the same mesh won’t conflict.
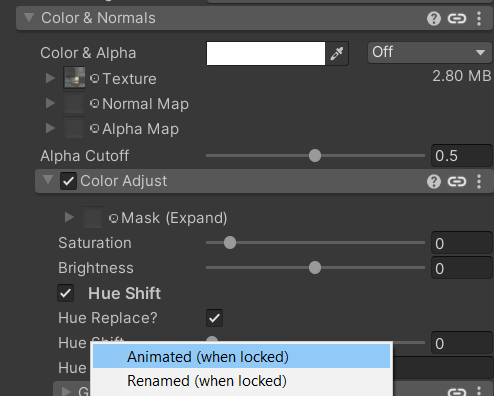
Where to find the Hue Shift option in the Poiyomi shader, and how to set it to Animate when locked (or Renamed when locked)
Quest Hue Shift
Sadly, Quest doesn’t have an easy way to do Hue Shifts like PC does. It is possible by animating the Red, Green and Blue values of the Main Color field in an animation to emulate a hue shift, but that will need more work to set up and also will tint the entire object that color instead of hue shifting.
Scalers
Radial Puppets are also sometimes used for scale animations. These are made in the same way as the Hue Shift animations, but instead of animating the Hue Shift Material Property, you animate the Transform Scale x, y, and z properties.
Multi-Toggles
A Multi-Toggle is a way for one Radial Puppet to switch between multiple mutually exclusive options. For example having five different tops, or maybe even a bunch of combinations of them. The world is your oyster.
Multi-Toggles can theoretically be made with both the Blend Tree and the Motion Time methods, but the Motion Time method is by far easier and less error prone.
To create a multi-toggle, you will want to create one keyframe per option, and enable/disable the GameObjects you want to disable for that option. Make sure every GameObject is animated at every keyframe. At the end, you want to copy and paste the last keyframe, to make sure all options have one set of keyframes where they are the one that is enabled. Then, select all keyframes and set Both Tangents to Constant.
The whole process, from start to finish, is shown here. As the result, the GameObjects Item0 to Item4 are toggled based on the rotation of the puppet.